There are problems backing up Mac OSX computers to network shares (other than Apple :)) because Apple uses some proprietary protocols (to better sell other products :)). Instead of searching workarounds such as creating virtual disks on remote shares, I’ve found out a nicer option by searching the web.
SOLUTION: Installation of
a) Netatalk – an open-source implementation of AppleTalk protocols
b) Avahi – system for multicast service discovery in local networks
I own an older desktop PC “Barsabass”, running Ubuntu 11.10, which also serves me as DLNA, file server and from now on also as Time Machine backup server. In the following a simple procedure to get Time Machine from Mac to PC working is described. You can further add other shares or properties (conf files are nicely documented).
INSTALLATION:
Step 1: Install netatalk and avahi packages.
apt-get install netatalk avahi-daemon
Step 2: Enable netatalk server by editing /etc/netatalk/afpd.conf. Add following line.
“Barsabass” -tcp
Step 3: Enable some Apple shares by editing /etc/netatalk/AppleVolumes.default. Add line containg path to share folder (= TimeMachine bakup location), name of share, allowed users.
/media/Dokumenti/bcpks/slavko_mbpro_tm “slavko_mbpro_tm” allow:slavkoz
Step 4: Enable netatalk server run parameters in /etc/default/netatalk.
Step 5: Setup afpd for broadcast. Create file /etc/avahi/services/afpd.service.
<?xml version=”1.0″ standalone=’no’?><!–*-nxml-*–>
<!DOCTYPE service-group SYSTEM “avahi-service.dtd”>
<service-group>
<name replace-wildcards=”yes”>%h</name>
<service>
<type>_afpovertcp._tcp</type>
<port>548</port>
</service>
<service>
<type>_device-info._tcp</type>
<port>0</port>
<txt-record>model=Xserve</txt-record>
</service>
</service-group>
Step 6: Restart both services.
/etc/init.d/netatalk restart
restart avahi-daemon
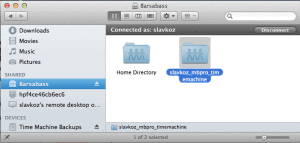
Step 7: Use Time Machine backup and enjoy! Your configured share should be now visible like on the picture below. After you successful share access by Finder, you can select the network drive in Time Machine and begin backing up you Mac.

There is new Netatalk version >= 2.2.1 and OSX Mountain Lion -> follow tutorial at http://pwntr.com/2012/03/03/easy-mac-os-x-lion-10-7-time-machine-backup-using-an-ubuntu-linux-server-11-10-12-04-lts-and-up/.