In this demo I will show how semantic data can be easily created and manipulated using ontologies and NoSQL datastores. In the tutorial I will use:
- Protege 4.2 beta: The tool to design (test) ontologies.
- Fuseki: SPARQL endpoint within Apache Jena project. To completely run on “real” NoSQL database, use Jena TDB store (will be covered in further tutorials).
- RelFinder: Simple tool for searching connections between instances in provided semantic sources.
Prior knowledge to follow: Some basics about ontologies and NoSQL.
First we will design an ontology and fill it with some initial instances. Then we will save output as RDF/XML format and import it to Fuseki. There we will run some simple queries. At last we will connect RelFinder to our Fuseki instance and search for relations between two instances.
Let’s begin…
1. Ontology development
We will develop simple ontology schema that defines Person and Car classes. Person can sell or drive a car. Some basic data properties we will include are name, address, type, etc. The ontology namespace will be http://zitnik.si/ontos/owl/ss2demo.
Some of the instances we will fill into the ontology:
- Janice_Dickinson sells BMW_X6
- Janice_Dickinson drives Volkswagen_Lupo
- Janice_Dickinson Name “Janice”
- Slavko_Zitnik sells Volkswagen_Lupo
- Slavko_Zitnik Name “Slavko”
An example RDF/XML output from Protege can be downloaded here.
2. SPARQL endpoint setup
At this step we will need to download Fuseki and run it in the following way:
[codesyntax lang=”bash”]
./fuseki-server --update --mem /ds
[/codesyntax]
With this command, we have used settings for “ds” dataset in config.ttl, enable updating the database with new data and create empty memory-based store. If everyhing goes well, we should have our server running at http://localhost:3030/. At that site you should choose Control panel link and then select “/ds” source. In the File Upload section, select .owl file from previous step and upload it to server. Now the database should be filled with some triples.
To view all the triples, go back to SPARQL Query form and run:
[codesyntax lang=”bash”]
SELECT * { ?x ?y ?z}
[/codesyntax]
To find out who sells the BMW_X6, run:
[codesyntax lang=”bash”]
PREFIX ss2: <http://zitnik.si/ontos/owl/ss2demo#>
SELECT * { ?x ss2:sells ss2:BMW_X6}
[/codesyntax]
Play a little bit with the queries. If you are new to SPARQL search the internet for some tutorials – there are lots of them.
3. RelFinder demo
Now we will connect to our database via RelFinder.
- Go to http://www.visualdataweb.org/relfinder/relfinder.php.
- Click propertis button and remove all predefined sources.
- Create new config, named SS2:
- Endpoint URI: http://YOUR_PUBLIC_IP:3030/ds/query (enable port forwarding on a router if you are behind NAT)
- Check Don’t append /sparql
- Check Use proxy
- Select GET method
- Add autocomplete URI: http://zitnik.si/ontos/owl/ss2demo#Name (The fields that will be supported by autocompletion on query input)
- Click OK and test connection with Query tool.
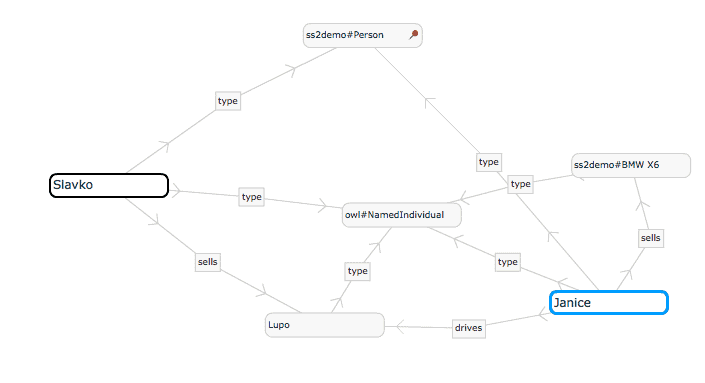
Now if you choose input “Janice” and “Slavko”, you should get the following result:
 Play a little bit with visualization options. Nicer output can be achieved by hiding type connections. Therefore we see that Slavko is selling the car that Janice has been driving.
Continue playing with semantics, ontologies and stay tuned until next tutorial in which we will cover ontology manipulation via Jena API with TDB disk store.
